For whatever reason I felt like trying something new with my makeup today. I decided to do a wearable smokey eye with purple and black and I wanted to share how it turned out along with the rest of the products I used on my face. All of the products I used are affordable and easy for anyone to get (at least if you're in Canada or the US). If you don't live in North America or can't access the same products I used...use what you have that is similar, or make it your own with your own twist using your own products! I hope this inspires you to step out of the box from your norm and I hope you all enjoy this look! =))))
I am going to post a picture of the look full face, please excuse my appearance, I decided to post about this AFTER I had my makeup on all day long. (The post is about the look, not my appearance anyway right? :P)

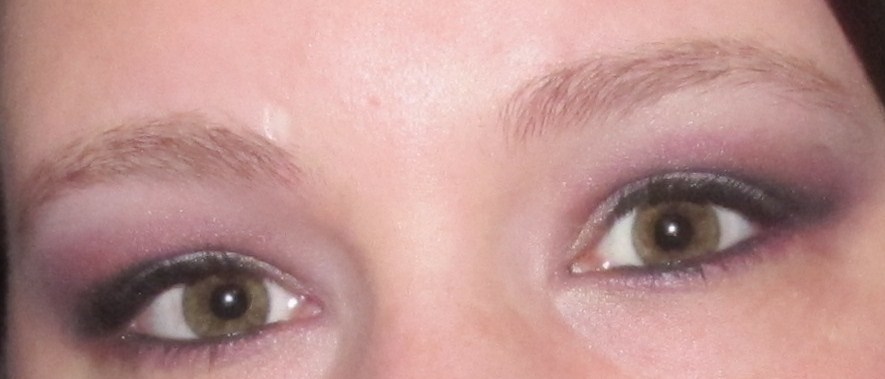
I guess I will start off with my eye makeup, here are a couple of closeups of the eye look so you can see how it looks up close.

Next I will show you a photo of the tools and products you will be needing.

From left to right: Spa Resource "crease blender" brush, Q-Tips, Elf's "Professional Eyeshadow Brush", Eco Tools angled eyeliner brush, Eco Tools blending brush, Eco Tools mineral blending brush.

PRODUCTS USED: Wet n Wild color icon 6 pan palette in "Greed", NYX single eyeshadow in "Prune", Palladio herbal eyeshadow primer, NYX jumbo eye pencil in "Milk", Hard Candy Lashaholic mascara in "Blackest Black", Revlon colorstay liquid eye pen in "Blackest Black", and Avon's glimmersticks diamonds in "Smoky Diamond".
Ok so with all of that out of the way, let's move on to how I achieved the eye look. Apply eyeshadow primer and allow to dry. Next, with your angled eye liner brush, cut your crease with a matte black shadow. After you cut your crease use the side of your angled eyeliner brush and "flick" the matte black until your crease is shaded to your satisfaction. Next, take the tip of the eye liner brush, dip it in the black and create the outline for your outer V by simply placing the tip end of the brush diagonally on your outer V area, also use a "flicking" motion inward to get some of the black on the outer corner of your eye. TIP: build up the black slowly if you want it to look right.
Next take your white eyeshadow base and put it on the lid being careful not to touch the black you have already applied. Carefully blend it out and apply a light sparkly purple to your lid with a flat shader brush. Next take your domed crease blender brush and dip it into a sparkly black shadow...blend out all harsh lines with this over top of the matte black and blend until you get your desired shape. Next take a matte prune or purple color and blend it out over top of the black going almost to your brow, to the top of your brow bone.
Once you have finished this, take a super fluffy blending brush and blend, blend, blend. Then take the matte skin tone highlighter shade and use it to highlight your brow bone and blend things even more. Lastly, take your angled eyeliner brush and clean it off on a tissue or the back of your hand (or use a clean one), apply the prune/purple eyeshadow you used above your crease to your bottom lash line. Make sure to connect it with the eye shadow you applied on top. If you have fallout, use a fluffy blending brush (I used the Eco Tools mineral blending eyeshadow brush) and sweep it away.
After all that, apply your liquid eyeliner as thick or thin as you want it, making sure to apply as close to the lash line as possible. Apply whatever black eyeliner you want to your water line, curl your lashes, and apply as much coats of mascara as possible for bold black lashes. That pretty much completes the eye look!
For the rest of my face, I used the following tools and products.

From left to right: Eco Tools all over powder brush, Elf Studio Powder Brush, cosmetic sponge.

Revlon Age Defying foundation in "05 Fresh Ivory", NYC concealer in a jar in "CJ02 Fair", and NYC Smooth Skin translucent loose face powder.

Femme Couture mineral effects blush in "Sweet Blush", NYC matte bronzer in "Sunny", Hard Candy Glossaholic lipgloss in "Gorgeous" and Rimmel London lasting finish lipstick in "070 Airy Fairy".
Do the rest of the face with whatever you choose, I just wanted to show you all what I used for face, cheeks and lips...all great products by the way that I highly recommend!!!
I lightly dampened my cosmetic sponge and pumped my foundation onto the back of my hand and then applied my foundation with the sponge...after applying that, I applied concealer under my eyes and anywhere else it was needed and I set all of that with translucent powder. Then I applied my bronzer in the "3" shape in the hallows of my cheeks, on my temples, and on my jaw line...I swirled the remaining bronzer on my brush on the rest of my face. (I used the Eco Tools powder brush for my translucent powder and bronzer for a softer application due to the eyes being bold.) Then I just applied blush, lipstick and lip gloss. <3
I really hope you all enjoyed this look, please bear with me...I am still new at this and I am just blogging to have a good time and share what I love with the world. :)
Thanks so much for reading and more posts are to come!
No comments:
Post a Comment